Like us on Facebook
Call Us Now! 01286 239 537
Showing posts with label iPhone Apps. Show all posts

Thursday, 18 August 2016

11 apps and gadgets to turn your phone into something else


Your mobile is more versatile than you think

Smartphones are versatile bits of kit right out of the box but with a well-chosen accessory or app you can do even more with the gadget in your pocket - from gazing at the stars to acting as a backup to your Kindle e-reader, you can add a lot of extra strings to its bow.

We've picked out 11 of our favourite such uses in the list below, so if you're done exploring all the usual tasks your phone can cover - from Snapchat to video calls- then give these a try. You might be surprised at what your phone can do with the right tools installed.

1. Radar gun


By using a reference measurement taken through your iPhone's camera, SpeedClock for iOS can turn your Apple handset into a makeshift radar gun and measure motion speed.
You get high-speed video recording, synchronised timing gates (for measuring speed between two points) and more. Unfortunately there's no decent option on Android yet.

2. Game Boy


Behold the Smartboy, a case for your Android phone that turns it into one of the most iconic handheld gaming devices of all time (either a Game Boy or a Game Boy Colour).
However, at the moment the case is only on sale to developers (for $59.99 or about £45) as makers Hyperkin Lab look to get the device software polished and ready for a full release.

3. Telescope


You can't actually turn your tiny phone camera into a bona fide telescope, but there are a bunch of very cool apps that let you point your handset at the stars and get real-time info.
SkySafari for Android and iOS is one of the most comprehensive apps for the job we've seen. Upgrade to the Pro or Plus versions and you can control your home telescope too.

4. VR headset


Join the VR revolution with your phone. The Gear VR is perhaps the best-known virtual reality accessory, though you need a recent Samsung Galaxy handset to be able to use it.
It's not the only option: Google Cardboard headsets work with Android and iOS devices and other low-cost devices worth a look include the Homido and the Zeiss VR One.

5. Dash cam


You might already use your phone as a sat nav but it works pretty well as a dash cam too if you get the right app installed (and they can be very handy for your next insurance claim).
CamOnRoad for iOS and Android is one of the best picks although there are alternatives for both platforms. You can sign up for a premium account to get access to more features.

6. Spirit level


This is actually a built-in feature on iOS, though it's not all that easy to find: open up the Compass app, swipe to the left and there's your spirit level, ready for your next DIY project.
On Android (or indeed iOS) you can simply Google "spirit level" on the web and a spirit level widget appears, letting you know when your handset is perfectly level on a surface.

7. Microscope


The Micro Phone Lens was born on Kickstarter and can be yours for $49.99 (about £40) and above, turning almost any smartphone or tablet into a more precise scientific instrument.
You get a 150x level of zoom so if you've always wanted to run your own experiments and studies at home this is your chance. You get some specimen slides included with the kit.

8. Heart rate monitor


You probably already know your phone can count your steps if you've left yourfitness tracker at home, but you can turn your mobile into a fairly decent heart rate monitor too.
Instant Heart Rate for Android and iOS is a very good app for this, using your phone's camera to measure blood circulation and adding an extra variable to your health tracking.

9. Scanner


No need to go out and buy a bulky flatbed scanner, because your phone can do the same job for you, using its rear camera and a suitable app - again there are several to pick from.
CamScanner for Android and iOS is a very good option that works painlessly on both the major phone platforms, while Scanbot for iOS only is packed with features too.

10. E-reader


Your phone's bright screen may not be as easy on the eyes as an e-ink display, but you can still turn it into a handy e-reader with the help of the free Kindle app for Android and iOS.
You don't need to own a real, physical Kindle to read and buy books from Amazon, but if you do then your reading progress is synced across multiple devices and indeed the web.

11. Security camera


This probably suits an older smartphone or camera unless you want to leave your current mobile sitting at home all day, but it's another alternative use that's easy to set up.
Manything for Android and iOS is the most impressive and complete option we've seen but there are others, letting you view a live feed of your house from wherever you are.

Friday, 19 February 2016

How to Colour Splash photos on Android, iPhone and PC


The colour splash effect is a cool photo effect where a picture is first converted to black and white, then colour is added back to certain parts of the image. This works really well in images with a lot of bright colour because it looks much more dramatic when the rest of the image is converted to black and white and one items remains in colour.

In this article, I'm going to show you how you can colour splash your photos on the desktop and on your smartphone (iPhone and Android). I'll only mention the tools that I have used myself, but there are many alternatives on all platforms, so feel free to choose another tool if you like. The procedure for adding the colour splash effect is pretty much the same regardless of which tool or platform you use.

Here’s a quick before and after example of the colour splash effect:


When choosing a photo to colour splash, here are some guidelines for getting the best results: 

1. Choose a photo that has a lot of bright colours across the entire photo and make sure the part of the photo you colour splash takes up a large percentage of the photo. If you have a photo with one object that is very bright and the rest is darker or neutral colours, colour splashing the bright part won’t make much of a difference.

2. If the part you choose is too small, the effect won’t look good either. As you can see from above, the boy in the above picture doesn't take up a lot of the photo and therefore the effect is not as dramatic. He is wearing bright colours, so that helps a bit.


Desktop Tool


On the desktop, the best way to colour splash a photo is to use an online tool. They are free, easy to use and don’t require you to install anything on your hard drive. The first online tool I recommend is Fotor. Click Get Started and wait for the editing interface to load.


Now click on the Open button and choose the location where you want to import your picture from. Once the picture is loaded, click on Colour Splash in the left-hand side of effects.


You can choose from a couple of free effects, which don’t have the small diamond icon at the top right. I chose the top one with the flower and it worked just fine for me. Now you adjust the brush size and start colouring in the part or parts of the photo you want to add colour back to.


Once you have added the effect to your image, click on the Save icon at the top next to the Open button. You can now save the file to your computer for free and it doesn't add any kind of watermark or anything like that.


iPhone App


A good app on the iPhone for the colour splash effect is Colour Splash by Pocket Pixels. It costs £0.79, but is totally worth it. This app seems to be a lot better to use than the online tool mentioned above.

Using your finger is actually the perfect way to add colour back to the photo and pinching and zooming with your hands makes it super easy to edit only the parts you want.


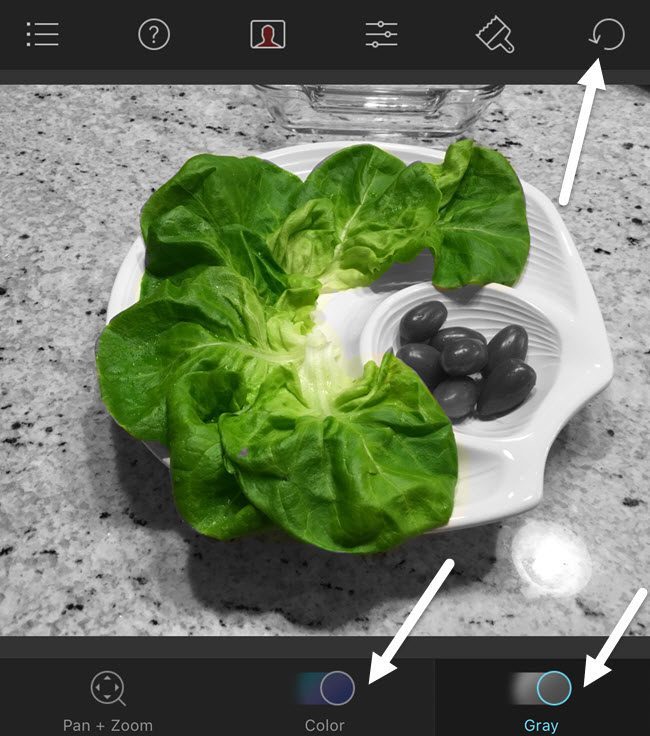
As you can see, it’s really easy using the app to colour in complex objects with lots of curves using just your fingers. Once you load an image, it will be grayed out and you can start colouring in by tapping on Colour at the bottom and then moving your finger across the image. When you want to move the image, tap Pan + Zoom or just use the pinch motion with your fingers.

Tap on Gray if you added too much colour and want to black and white parts of the image again. At the top right, you can undo your actions easily. When you are done, just tap the icon at the top left to save the image to the camera roll, share the image or load a new image.


Android App


On Android, I used Colour Splash Effect by a company called City Photo Editor. There are a lot of other free options, so you have quite a bit of choice. Some of the other programs are full photo editors and one small feature is the colour splash effect.


This program is pretty much the same as all other colour splash apps. Tap the magnifying glass in order to zoom and move the picture around. Then tap on Free Colour or Smart Colour to start colouring in the image. Use the Eraser to make parts black and white again.

Overall, colour splashing is really easy to do on all platforms and mostly takes time and patience. Now you can post cool photos to Facebook or Instagram and impress your friends or followers! Enjoy!