The colour splash effect is a cool photo effect where a picture is first converted to black and white, then colour is added back to certain parts of the image. This works really well in images with a lot of bright colour because it looks much more dramatic when the rest of the image is converted to black and white and one items remains in colour.
In this article, I'm going to show you how you can colour splash your photos on the desktop and on your smartphone (iPhone and Android). I'll only mention the tools that I have used myself, but there are many alternatives on all platforms, so feel free to choose another tool if you like. The procedure for adding the colour splash effect is pretty much the same regardless of which tool or platform you use.
Here’s a quick before and after example of the colour splash effect:


When choosing a photo to colour splash, here are some guidelines for getting the best results:
1. Choose a photo that has a lot of bright colours across the entire photo and make sure the part of the photo you colour splash takes up a large percentage of the photo. If you have a photo with one object that is very bright and the rest is darker or neutral colours, colour splashing the bright part won’t make much of a difference.
2. If the part you choose is too small, the effect won’t look good either. As you can see from above, the boy in the above picture doesn't take up a lot of the photo and therefore the effect is not as dramatic. He is wearing bright colours, so that helps a bit.
Desktop Tool
On the desktop, the best way to colour splash a photo is to use an online tool. They are free, easy to use and don’t require you to install anything on your hard drive. The first online tool I recommend is Fotor. Click Get Started and wait for the editing interface to load.

Now click on the Open button and choose the location where you want to import your picture from. Once the picture is loaded, click on Colour Splash in the left-hand side of effects.

You can choose from a couple of free effects, which don’t have the small diamond icon at the top right. I chose the top one with the flower and it worked just fine for me. Now you adjust the brush size and start colouring in the part or parts of the photo you want to add colour back to.

Once you have added the effect to your image, click on the Save icon at the top next to the Open button. You can now save the file to your computer for free and it doesn't add any kind of watermark or anything like that.
iPhone App
A good app on the iPhone for the colour splash effect is Colour Splash by Pocket Pixels. It costs £0.79, but is totally worth it. This app seems to be a lot better to use than the online tool mentioned above.
Using your finger is actually the perfect way to add colour back to the photo and pinching and zooming with your hands makes it super easy to edit only the parts you want.
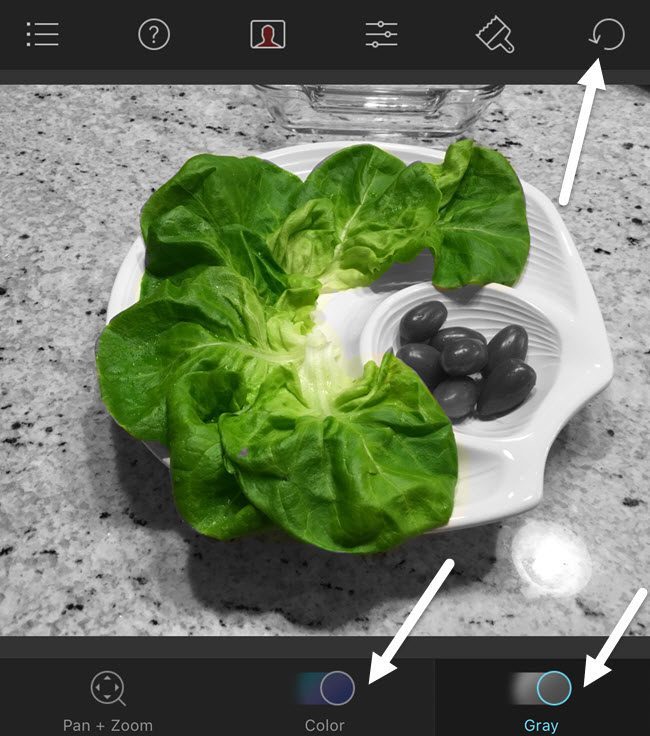
As you can see, it’s really easy using the app to colour in complex objects with lots of curves using just your fingers. Once you load an image, it will be grayed out and you can start colouring in by tapping on Colour at the bottom and then moving your finger across the image. When you want to move the image, tap Pan + Zoom or just use the pinch motion with your fingers.
Tap on Gray if you added too much colour and want to black and white parts of the image again. At the top right, you can undo your actions easily. When you are done, just tap the icon at the top left to save the image to the camera roll, share the image or load a new image.
Android App
On Android, I used Colour Splash Effect by a company called City Photo Editor. There are a lot of other free options, so you have quite a bit of choice. Some of the other programs are full photo editors and one small feature is the colour splash effect.

This program is pretty much the same as all other colour splash apps. Tap the magnifying glass in order to zoom and move the picture around. Then tap on Free Colour or Smart Colour to start colouring in the image. Use the Eraser to make parts black and white again.
Overall, colour splashing is really easy to do on all platforms and mostly takes time and patience. Now you can post cool photos to Facebook or Instagram and impress your friends or followers! Enjoy!
You can also try great Macphun photo editing app for MAC https://macphun.com/fxphotostudio this is my favorite one, I think this is the best paid photo editing software for MAC.
ReplyDeleteThis slow down can occur for a variety of reasons and when it happens it can be frustrating and spoil your computing experience. Often times when this happens it can be corrected by either cleaning up your hard drive, or running some diagnostics.click for more info
ReplyDeleteI am always searching online for articles that can help me. There is obviously a lot to know about this. I think you made some good points in Features also. Keep working, great job! Learn more
ReplyDeleteThis article is an engaging abundance of enlightening information that is intriguing and elegantly composed. I praise your diligent work on this and thank you for this data. You have what it takes to get consideration. maggiori informazioni
ReplyDeleteI am all that much satisfied with the substance you have specified. I needed to thank you for this awesome article. Mehr Informationen
ReplyDeleteJust admiring your work and wondering how you managed this blog so well. It’s so remarkable that I can't afford to not go through this valuable information whenever I surf the internet! mejoresvpn.com
ReplyDeleteJust admiring your work and wondering how you managed this blog so well. It’s so remarkable that I can't afford to not go through this valuable information whenever I surf the internet! https://privacyonline.com.br
ReplyDelete