Like us on Facebook
Call Us Now! 01286 239 537

Sunday, 21 February 2016

QUICK TIPS: How to recover overwritten Microsoft Office documents


For life's "Uh-Oh"  moments - here's how to recover that accidentally overwritten Word document. 


I bet you've been there more than once in your life. You have a Microsoft Office document open (Word, Excel, PowerPoint, etc.) and you instinctively click the Save button...or better yet, use the Ctrl + s key to save...and then realise you meant to use the Save As feature rather than Save! Uh-oh, that original document has been written over and you can never recover it! But wait, there is hope... 

Many years ago Microsoft realized that being able to recover previous versions of a document was a valuable feature so they incorporated it into all of their programs. You can access these previous versions by following these steps:

1. Open the file that you want to restore to its previous version

2. Click the File tab and click on Info

3. On the right, select the version you want to open from the versions list

4. Click the Restore button when the file opens


There, now won't you sleep more soundly tonight knowing that Microsoft has your back?

Like this tip? Want more? Be sure to like our Facebook Page for more Quick Tips, How To articles, and lots of special offers and giveaways from your favourite North Wales Computer Shop :) 

Friday, 19 February 2016

How to Colour Splash photos on Android, iPhone and PC


The colour splash effect is a cool photo effect where a picture is first converted to black and white, then colour is added back to certain parts of the image. This works really well in images with a lot of bright colour because it looks much more dramatic when the rest of the image is converted to black and white and one items remains in colour.

In this article, I'm going to show you how you can colour splash your photos on the desktop and on your smartphone (iPhone and Android). I'll only mention the tools that I have used myself, but there are many alternatives on all platforms, so feel free to choose another tool if you like. The procedure for adding the colour splash effect is pretty much the same regardless of which tool or platform you use.

Here’s a quick before and after example of the colour splash effect:


When choosing a photo to colour splash, here are some guidelines for getting the best results: 

1. Choose a photo that has a lot of bright colours across the entire photo and make sure the part of the photo you colour splash takes up a large percentage of the photo. If you have a photo with one object that is very bright and the rest is darker or neutral colours, colour splashing the bright part won’t make much of a difference.

2. If the part you choose is too small, the effect won’t look good either. As you can see from above, the boy in the above picture doesn't take up a lot of the photo and therefore the effect is not as dramatic. He is wearing bright colours, so that helps a bit.


Desktop Tool


On the desktop, the best way to colour splash a photo is to use an online tool. They are free, easy to use and don’t require you to install anything on your hard drive. The first online tool I recommend is Fotor. Click Get Started and wait for the editing interface to load.


Now click on the Open button and choose the location where you want to import your picture from. Once the picture is loaded, click on Colour Splash in the left-hand side of effects.


You can choose from a couple of free effects, which don’t have the small diamond icon at the top right. I chose the top one with the flower and it worked just fine for me. Now you adjust the brush size and start colouring in the part or parts of the photo you want to add colour back to.


Once you have added the effect to your image, click on the Save icon at the top next to the Open button. You can now save the file to your computer for free and it doesn't add any kind of watermark or anything like that.


iPhone App


A good app on the iPhone for the colour splash effect is Colour Splash by Pocket Pixels. It costs £0.79, but is totally worth it. This app seems to be a lot better to use than the online tool mentioned above.

Using your finger is actually the perfect way to add colour back to the photo and pinching and zooming with your hands makes it super easy to edit only the parts you want.


As you can see, it’s really easy using the app to colour in complex objects with lots of curves using just your fingers. Once you load an image, it will be grayed out and you can start colouring in by tapping on Colour at the bottom and then moving your finger across the image. When you want to move the image, tap Pan + Zoom or just use the pinch motion with your fingers.

Tap on Gray if you added too much colour and want to black and white parts of the image again. At the top right, you can undo your actions easily. When you are done, just tap the icon at the top left to save the image to the camera roll, share the image or load a new image.


Android App


On Android, I used Colour Splash Effect by a company called City Photo Editor. There are a lot of other free options, so you have quite a bit of choice. Some of the other programs are full photo editors and one small feature is the colour splash effect.


This program is pretty much the same as all other colour splash apps. Tap the magnifying glass in order to zoom and move the picture around. Then tap on Free Colour or Smart Colour to start colouring in the image. Use the Eraser to make parts black and white again.

Overall, colour splashing is really easy to do on all platforms and mostly takes time and patience. Now you can post cool photos to Facebook or Instagram and impress your friends or followers! Enjoy!

Saturday, 13 February 2016

HOW TO lock down your Facebook privacy settings


Chances are, you've got a Facebook account - but do you know which parts of it are private and which parts are open for all to see? Understanding the various visibility rules for your posts can be confusing but we're here to explain everything in simple terms.

You can even cover your tracks retroactively, should you need to, so that video of you making a fool of yourself at the office Christmas party doesn't have to be viewable by everyone if you don't want it to. (You're not secretly proud of your antics, are you?)

Choose your audience


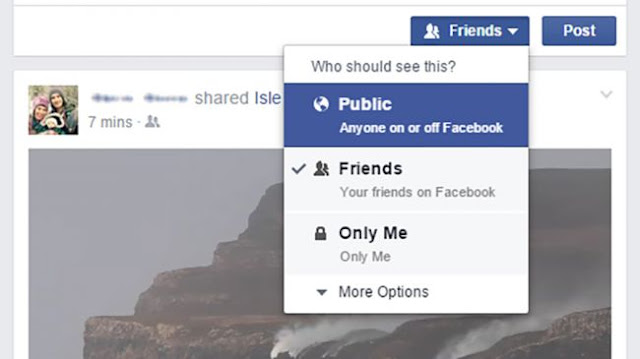
Whenever you post something to Facebook, whether through the website or through an app running on a mobile device, you'll see an audience selector drop-down list somewhere on the screen: this controls who can see your post when you put it on the social network.

The options range from everyone with a web browser ("Public") to no one but you ("Only Me"). Facebook lets you set up customised lists of contacts, so you could keep some posts specifically for your family, your work colleagues or your best friends, for example.


Choose Custom from the audience selector drop-down and you can even name specific people who can or can't see the post. If you've tagged someone else in it, then you can block his or her friends from seeing the update from the same dialogue box.

Most people just don't care enough to set different visibility levels for different posts, but it is actually a rather useful way of taking control over who can see what on your Facebook page - although there are some caveats, as we'll come to further down.

Limit other people's posts


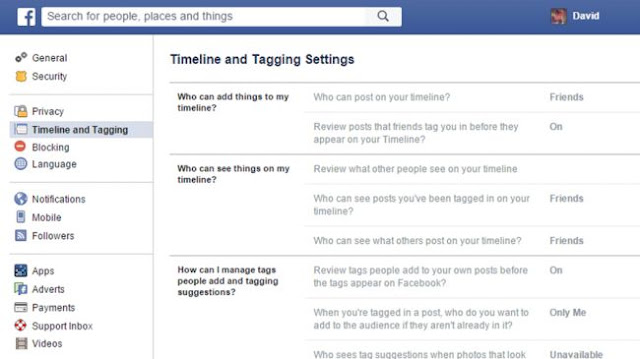
If you don't want other people tagging you in posts, go to the Facebook settings page on the web, then choose Timeline and Tagging. There's an option to let you review and approve tags before they're applied to posts (though the post itself still goes up).

For those times when you really have a problem with what someone else is doing on Facebook, there are report and block options available, via the drop-down menus for individual posts and the Blocking section of the master Facebook Settings screen).


The Timeline and Tagging screen controls who can post on your timeline and gives you the option of reviewing these posts in advance too. If you then click on Privacy on the left it's possible to configure the options for who's able to contact you over Facebook.

You can limit people who can send you friend requests to friends of friends, for example, and stop people from adding you based on your email address and phone number. Note there's a master audience selector option located on this settings page too if you need it.

Remember it's not foolproof


There are ways around these settings: if you're in an embarrassing photo that someone else has uploaded, some of your mutual friends might recognise you even if you're not tagged. There's not much you can do except ask whoever uploaded it to take it down.

What's more, if you share a photo to just five people, there's nothing to stop one of those people copying and uploading it for the whole world to see, so if you've got a secret to keep then just don't put it anywhere near a social network in the first place.


That said, it is worth reviewing the privacy and post visibility settings linked to your Facebook account, even if it's just to make sure you're not inadvertently putting any sensitive information out there on your profile for the wider world to see.

Ultimately it's just a question of thinking twice before you share anything (such as the location of a photo taken where you work or live) and making use of the plethora of options Facebook has available to tailor your social media privacy rules accordingly.

Check activity and post visibility


Open up your Facebook profile page and there are two useful features here. First, click on View Activity Log to see your recent activities on the social media site (from likes to status updates) and to deal with any posts from friends you might have been tagged in.

Here you can block or remove tags, undo pretty much everything you've ever done on Facebook, and remind yourself who can see particular bits of information that you post (via the audience visibility settings shown via icons down the right hand side).


Head back to your profile page and click the menu button (three horizontal dots) then choose View As - you can see what a random passing member of the public is able to view on your timeline, or view your profile page as it appears to a specific contact.

The different parts of your profile have more or less the same audience selector options as your posts: choose About from your profile then follow any of the edit links to make changes (to hide your hometown from everyone except your family, for example).


Thursday, 4 February 2016

HOW TO keep your laptop cool


Does your laptop get so hot that you could fry an egg on it? If so, you might be interested to know that excessive heat doesn't just make your laptop uncomfortable to use, but can also damage it over time.

A quick fix for overheating issues can be to use it on a desk (rather than your knee). But, if that doesn't work, our top tips to reducing your laptop’s temperature should help cool it off and keep it at its peak.

1) Switch the power plan


Laptops tend to run to different power plan settings, and these can be adjusted to help keep your laptop cooler if it’s overheating. Switching from High Performance to Balanced or Power Saver mode will mean that your processor isn't running at full whack, and stays cooler. Tasks and programs will still run just fine, but your processor won’t hit its maximum potential. To change your laptop’s power plan, right click the battery icon in the notification area of the desktop and choose from those available. To see the other plans available to your system, select More power options from the pop-up box, and view the additional plans and their impacts on system performance.

2) Power manage your processor


As your laptop’s processor is a key source of any system heat, you can alter the maximum amount of work it is allowed to do. This in turn will help to reduce the maximum heat produced. To do this, check the power plan you are using. Then go to Start > Control Panel and choose Power Options. In Power Options click Change plan settings next to the plan you are using. On the next window choose Change advanced power settings. Scroll down to, and expand, Processor Power Management, and then expand Maximum processor state. This option allows you to manually choose the maximum amount of workload your processor can take on at various times. Reducing the percentage will reduce the maximum performance available, but also the maximum heat which will be produced.

3) Buy a cooling stand


You don’t have to rely on your laptop’s own cooling and ventilation system; there are plenty of products which offer extra cooling to help draw heat away from your device. Cooling stands are generally designed for use on a flat surface like a desk or table, and help to keep your laptop cool by lifting it off the surface and providing air circulation. A further advantage is that the tray lifts the screen into a position that can be better for your posture. Cooling trays cost from as little as £10, give us a call or send us a message if you'd like one.

4) Have the cooling system serviced


It is possible that an unusually warm laptop has its ventilation obstructed, fans broken or blocked, or needs new thermal paste on the processor. If you think this might be the case, give us a shout and we'll book your laptop in for a repair/service. This costs from £30, making it a lot cheaper than having to replace parts from overheating or buy a new laptop!